Tuesday, September 16, 2014

Weeks 28-30 - Interior paint, siding and back porch

Weeks 28 through 30 seemed like they were mostly spent killing time while the interior was painted. We needed to get the inside painted before the cabinets could get installed, which needed to come before the sinks could be installed, which in turn needed to come before the plumbers could show up. Since the plumbers and the electricians had to work together to get the water heaters installed, the electricity was also held up. Given that only one guy, Jeff, was available to do the painting, it took forever. I was pulling my hair out the whole time. The progress was painfully slow, but we still managed to have some exciting moments.

Week 28 - Interior primer and exterior siding


I was glad that the appearance of the outside began to change as the siding went up. I was worried that my neighbors were thinking that I had run out of money.

Bright and wonderful


Inside, as soon as the primer went up, you began to get a sense for how bright and wonderful the interior of the home would be. For some reason, covering up the grey drywall with white paint changed the feel in a remarkable way, almost from a dingy prison cell to a wide open modern museum.

The most exacting siding in the world


There’s something satisfying about siding — so perfectly straight and even. Neighbor Jesse commented that British scientists could calibrate their standard reference length of a meter off of how perfectly the siding is spaced. The drawback is that the siding is taking forever: measure a piece, cut it, try to fit it in place, measure it again, cut it again, try to fit it in place again, repeat. I can’t imagine how this is going to work when they have to climb up and down a ladder for every cut.

Week 29 - Interior paint color fiasco


I was feeling busy so I figured I would save myself the trouble and just go with GO Logic’s standard interior color. After all, they are the experts.

Avoid Oxford White at all cost


I knew something was wrong when I saw the paint on the wall, but I waited a day to see how it would look after a second coat. By the time I got a chance to take a look at the color again, the whole upstairs had been painted in the most disturbing tint of white that has ever been observed by any human in the history of humankind. The painter Jeff was crying with the paint brush in his hand, it was that bad. A strange green tint would appear at different angles, under different lighting, and trick you into thinking that the walls were actually green. But then you would look directly at the wall and it would innocently switch to a perfectly white looking white, just to mess with you.

Always put up multiple colors on the wall for comparison


I ran to the paint store and discovered that every single white paint swatch looked exactly the same — no weird green tints, just white versus white versus white. By scrutinizing the colors inside, outside, in the sun, in the shade, I finally arrived at Mountain Peak. For comparison, I also took a can of Butter Pecan, which my parents have at their home. Once the colors were on the wall (above), it was clear that Mountain Peak was perfect, Butter Pecan was slightly too warm and Oxford White was to be avoided at all cost.

Lessons learned


In the end, it worked out and Mountain Peak turned out to be a wonderfully rich and creamy white, with just enough warmth to make the inside feel welcoming, yet bright enough to make it feel expansive. The lesson learned is that it is a good idea to pick out a set of colors and paint them on the wall before (a) buying all the paint upfront and (b) painting everything before getting feedback on the color.

Always double check that you received the correct item

There was one final lesson to be learned, however. I was super happy with the color choice until I noticed that the smell from the paint upstairs was quite strong. I’ve been extremely careful to avoid finishes that off-gas, and so I specified Ben Moore Natura, a zero VOC paint. The paint guy gave me all the paint in a box, I paid for it, delivered it to Jeff the painter, took off, and the next time I returned the upstairs was all painted. Somehow I ended up with the normal paint, not the Natura, and there was nothing I could do about it after the fact. So much for the healthy home thing.

Week 30 - Best back porch ever!


The back porch got started last week. Seemingly added on as an addendum at the last minute, it’s already one of the best features of the home. Most people assume that the main entrance is through the front main windows, but in fact it’s through the back side of the house. Hopefully the wrap-around driveway will clarify this in the future, directing you to the back porch which serves as a visual cue to the entryway.

The wide beams seem like overkill, but, aesthetically, something is so satisfying about their proportions. The siding — vertical slats of channel rustic lap siding — also seems like overkill. It is a lot of wood (pine), but it is beautiful, and somehow makes the porch feel like less of an outside space. The beams and the paneling will be coated with a natural sealer and the cedar deck boards will be left to age naturally.

Installing the standing seam roof, a neat roofing system


Tim Copinger and his crew stopped by to install the standing seam metal roof on the porch, so I got to see the process up close. The truck in the foreground has a giant machine that produces each metal sheet one by one, supply them right as the roofers install them.

The spool of Galvalume (an aluminum zinc alloy) on top feeds through some sort of mechanism that rolls out the metal sheets, bends up the edges, straightens out the sheets and automatically cuts them to size. It was neat to watch. You can see the flat piece emerging at the bottom right. The seams of each roof panel fit together and conceal a third piece, a clip. The clip fits under the panels and gets nailed to the plywood, and serves to keep the metal panels attached to the roof. Water can’t get through the seams to the clips so there’s no screw hole in the panels themselves to leak or require sealing. It’s a clever system.

Tuesday, August 5, 2014

Weeks 22-27 - Roof, blower door test, insulation & drywall

image-389

So much for my plan to update the blog every week. Ive been super busy, but at the same time the project slowed down to a crawl, so Ive bunched up the past month and a half into a single post. The builder had other jobs. We were waiting for this and that. Sadly, carpenter Don came down with lyme disease, but hes doing better already after a round of antibiotics. After a month and a half, we got the roof on (1 day), the blower door test done (2 hours), the rough plumbing and electricals (3 days), the insulation (3 days), the drywall mostly up (1 week) and the exterior window framing mostly done (lots of time).

Week 22 - Standing seam roof is beautiful, mostly

img-alternative-text

At first, the standing seam roof looked amazing, with a deep rich grey color and thin sleek seams widely placed apart. I was glad we went with the more expensive 24 gauge steal which is thicker, formed in the field, and doesnt have the more industrial looking ribbing.

img-alternative-text

But then I noticed that when the sun is high up in the sky, which happens to be a common occurrence, the roof material looks like a tin can about to crumple – kind of a cheap look for an expensive roof. Apparently, this is a common occurrence with standing seam roofs, a trade off for the extra durability and sleek look. By and large, the roof looks great from almost every angle, just not from the road during midday.

Week 23 - The blower door test, the ultimate reckoning

img-alternative-text

The blower door test is like a baseball pitchers earned run average (ERA), its the ultimate measure of the builders prowess. Everyone was anxious about how the test would turn out.

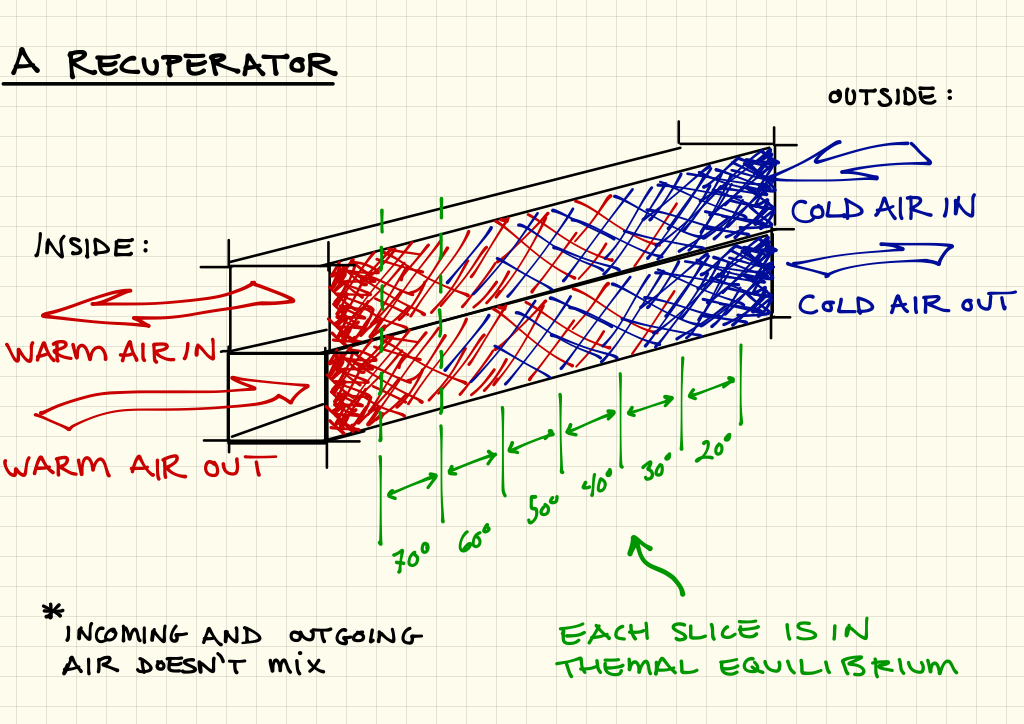
A critical part of the passive house concept is to seal the envelope of the building in order to prevent hot air from seeping out, and to avoid drafts of cold air from seeping in, which tends to be unpleasant in the winter. To verify the degree to which the house has been sealed up, we need to measure the flow of air passing through all of the little unsealed cracks in the envelope.

img-alternative-text

To do this, we replace the front door with a fan and use it to blow air out of the house, and then measure how much air passes through the fan. The flow of air passing through the fan must be equal to the flow of air through all the little breaks in the envelope; there is no other place for the air to go. Presumably (Im guessing here), the fan is calibrated such that the air flow can be determined from the fan speed, at a given pressure between the inside and the outside. The measured flow is not necessarily the real air leakage, however. The standard pressure used is 50 Pascals, which is substantially greater than you would normally get from wind or your ventilation system, but it serves to make sure everyone is testing under the same conditions.

Plugging up holes around the HRV

img-alternative-text

We hooked everything up and started measuring the flow, then ran around the house feeling for drafts to plug up. We found a couple of spots in the attic around the HRV where the exhaust and inlet ducts penetrate the air barrier. It seems that the HRV got positioned too close to the wall so it was difficult to tape around the duct adequately. Also, the angle at which the ducts cross the sheathing is not ideal. Its always tough dealing with subcontractors: they dont have much interest in making sure the air barrier will be easy to seal.

A spectacular "air changes" (ach) number, then a good ach

After plugging everything up, we got a final flow measurement, in units of cubic feet per minute (cfm). The certification guy (Mark Newey, of CET) then calculated the number of "air changes" per hour, meaning the fraction of air that would leak out of the house during an hour, arriving at 0.23 ach at 50 Pascals, an unbelievably awesome number! The passivhaus target is 0.6 ach and almost nobody gets down near 0.2 ach. We high-fived each other and went home. Only later — when I relayed the information to the architect — did we realize that we were using the wrong number for the volume of the home. In reality, the result came to 0.34 ach, still an excellent number and a huge testament to the amazing craftsmanship of Don the carpenter and the rest of the Integrity team.

Week 24 - The blown-in fiberglass insulation

img-alternative-text

At the last minute, GO Logic was running through their heating demand calculations and realized that the home wasn’t going to meet the 15 kWh/m2 per year goal set by Passivhaus. We decided to increase the thickness of the inner stud wall from 4" to 6" and to use blown-in fiberglass instead of blown-in cellulose, for its better R value. Cellulose is often recycled, but there is some concern about the fact that it is treated with chemical fire retardants, so I was glad to not have to worry about that. The fiberglass is made of recycled glass and does not need to be treated with fire retardants.

img-alternative-text

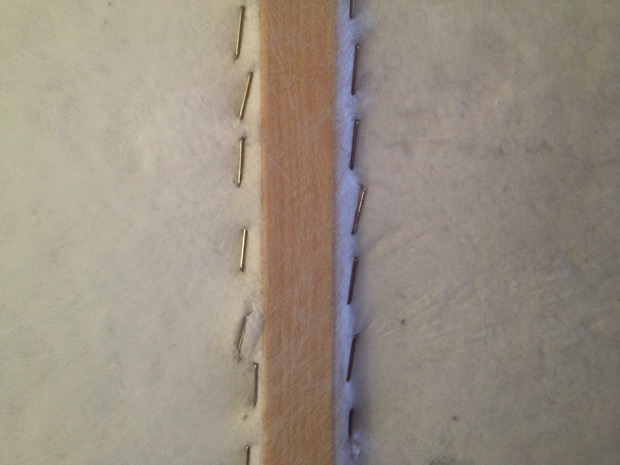
The first step is to put up a mesh consisting of a teflon paper type material.

img-alternative-text

The fiberglass is blown in through holes in the mesh until the stud cavity is completely filled and the fiberglass is compacted, creating a interesting artsy wall with a quilted look.

img-alternative-text

To keep the mesh from bulging outward, it is stapled at the studs, which makes for a cool stitch pattern. Too bad the walls are going to get covered with drywall.

Week 25 - What’s the purpose of drywall?

img-alternative-text

No offense to the drywall crew, but drywall strikes me as completely useless. The amount of material used is enormous. It’s bulky and heavy and takes forever to install. It uses up space and, after it was installed, it made the rooms feel smaller. Why not just tack up a thin panelling material?

img-alternative-text

It’s a good thing we enlarged the window to the stairway, and also good that it’s an operable window, otherwise it would have been impossible to get the massive drywall panels upstairs. Passing them through the window was still a major exercise. There must have been four or five loads, each as massive as the one you can see in the image above.

img-alternative-text

The drywall really makes the rooms feel closed-in and small, but apparently once the rooms get painted they open up again. I’m keeping my fingers crossed.

Week 26 - Finishing the drywall

img-alternative-text

Finishing the drywall took one guy over a week, being careful with the corners and sanding down everything nicely.

img-alternative-text

The upstairs hallway is starting to feel like a super nice spot in the home. It feels luxuriously large for a small home — almost too large — but I think we made the right decision to keep it big. For a while I played with tightening up the hallway to give more room for the bedrooms. In the end, the bedrooms indeed came out tiny, but that’s fine. For someone like me who struggles with insomnia, you want to keep your bedroom for sleeping, a dedicated space without distractions. The hallway, on the other hand, gets a lot more usage and impacts the feel of the home in a greater way: it’s your first impression as you walk up the stairs and it’s a common space that gets a lot of traffic.

img-alternative-text

Here’s a look at how sharp the drywall edges came out, which really helps give the windows a crisp modern look.

Week 27 - Window framing, starting the siding

img-alternative-text

Most of the week was spent finishing the window frames, a long and arduous process that seems to have taken 99% of the time spent building the house. I’ll have to write a dedicated post in the future describing the window framing. Each window required so much measuring and cutting and fitting things together — it’s like building a delicate piece of furniture, but the piece is hanging one story up in the sky and you need a ladder to access it.

img-alternative-text

The aluminum flashing was formed by Don in the field and careful cut and wedged into place.

img-alternative-text

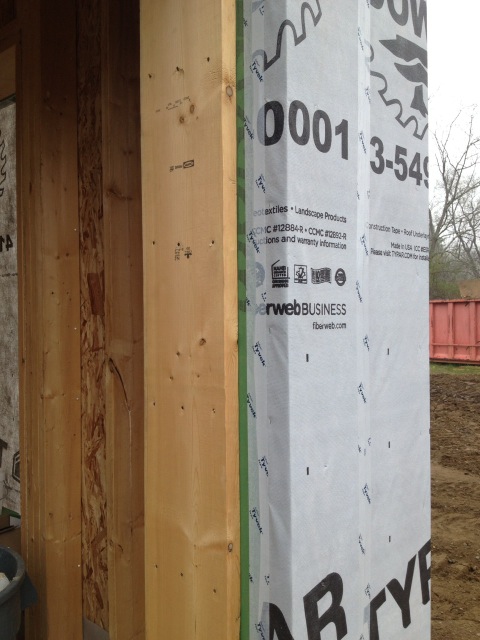
Here’s a shot of the spacers that will keep the siding offset from the walls. The little gap between the siding and the wall allows air to flow from under the siding up into the space just below the roof, rising at it warms up and serving to prevent the buildup of moisture that can lead to rotting.

Be sure to check out the photostream for more detailed images (with captions) of whats been happening. At the moment, however, the photostream is down, but hopefully Apple with have it back up soon.

Sunday, June 15, 2014

Weeks 20 & 21 - We now have windows

I was out of town for weeks 20 and 21, so I missed out on the whole window installation process, which was a major bummer. Kathy stopped by after week 20 and sent me some pictures of the windows, which helped prevent me from being eaten alive with curiosity.

Kneer-Suedfenster is a German window company that’s been around since 1932. Their windows are custom sized, passive house certified, triple pane, high quality and — surprisingly — cheaper than Marvin double pane windows.

Since Integrity hadn’t installed Kneer-Suedfenster windows in the past, GO Logic sent down one of their carpenters from Maine to give a demo installation and to inspect the windows after their long trip from Germany. The guys reported that the installation was easy. Most of the windows were in place after three days of work.

First impression: oh wow, the frames are huge

Oh no! Check out how much the actual window area has shrunk! Back when the SIPs were installed, the window openings were already squeezing me in. Now I feel like I’m on an airplane looking through a port hole. I guess it’s the price we pay for energy efficiency — windows lose a lot of heat, and even the south facing windows upstairs have to be kept small to avoid over-heating on sunny winter days. The small size of the windows upstairs is probably the biggest — or maybe the only — serious sacrifice that the Passivhaus standard has brought, but it’s still hard to swallow.

The master bedroom widows, however, work well at this size. The three widows let in a good amount of light and allow a nice view of the hillside, but still give you a bit of privacy.

Kneer-Suedfenster windows are pretty awesome

Once you walk up to these windows, you notice how exquisite they are. The handles make you feel like you’re getting into a Mercedes. The feel is solid. The look is simple and elegant. The clicking and latching sound of the locking mechanism is reminiscent of a car door unlocking. There’s even a whooshing sound as the seal is broken as the window opens.

The thickness and heftiness of the window is ridiculous. It feels more like you are opening the door to a vault at the bank than a window. The triple paned glass must be almost two inches thick!

There are three levels of rubber seals to ensure that the window is air-tight, in addition to a bomb-proof locking mechanism that locks at multiple points all around the perimeter.

Tilt and turn is fabulous

Most windows in the US either slide up or sideways, or have that little ridiculous crank handle at the bottom that is impossible to use. Tilt and turn windows, popular in Europe, open inward like a door (shown above). It’s easy, convenient and satisfying — you get a full wide open window that brings in a ton of fresh air. You can pop your whole body out the windows for a good look around. You can clean the outside of the glass and install the bug screen from the inside.

For just a little bit of fresh air, turning the handle upward allows you to open the window from the top down — the tilt position. This is great for when you don’t want to deal with a wide open window or it’s raining outside.

Not so happy about the dining room windows

At the last minute, GO Logic panicked about meeting the passivhaus heating goal of 15 kWh/m2 per year. They decided to widen the set of three large downstairs windows which let in a large chunk of the solar heat. It made sense to increase their size, but the dining room area now feels much more wide open than I originally imagined. The inside feels too exposed to the street and the window layout feels somehow out of balance. From the outside, the vertical symmetry between the upstairs windows and the downstairs windows is awkwardly upset.

I might just need to calibrate myself to the new look, but I can’t help but feel that this scenario illustrates something broken with the passivhaus design process. The last minute redesign probably resulted in a tiny reduction of the actual heat load — just enough to bring us under the 15 kWh/m2 target — but it forced a number of errors and difficult compromises to an otherwise well planned project. I don’t have an easy prescription for avoiding this situation in the future, but there must be a better way.

Important things to know about windows

There are three important terms.

U-Value is the thermal conductivity of the window, often given in units of [Btu/hr SF ℉]. Lower U-Value is better for keeping heat in the home. Take the inverse of the U-Value to get the R-Value, which is typically used to describe the thermal resistance of walls. Air has a much lower thermal conductivity than glass, so trapping a pocket of air between two glass panes dramatically reduces the thermal conductivity of the window. A U-Value of 0.5 is horrible. A U-Value of 0.1 is fantastic.

Visible Transmittance (VT) is the percent of visible light that passes through the window. A higher VT is generally better, unless you want to avoid direct sunlight or glare. Lower VT windows will look tinted.

Solar Heat Gain Coefficient (SHGC) is similar to VT, but for the whole solar spectrum. One amazing fact about the solar spectrum is that heat itself is radiated in an identical way to light — as photons. Radiant heat is light, we just can’t see it with our eyes. In fact, most of the energy in the solar spectrum is in the form of invisible heat photons. SHGC describes the fraction of the total solar spectrum (heat plus visible light, plus other stuff) that penetrates through the window. Consider two similar windows that both look completely transparent to the eye. One might allow a lot of heat photons to pass through — giving a high SHGC. The other might fewer heat photons to pass through — giving a low SHGC. High SHGC around 0.7 is great for south facing windows because they let in a lot of heat. Low SHGC around 0.2 is great for north facing windows because they won’t let as much heat escape from the inside.

Thursday, June 5, 2014

Week 19 -- The amazing ventillation system

Back from my trip to Korea and Japan, I have three weeks of exciting work on the house to catch you up on. The ventilation system went it in, although we ran into some issues about where to put some of the vents.

Tightly sealed homes are more comfortable

When you seal up the exterior shell of the building, it makes for a more comfortable home in addition to saving energy. When you open the front door, cold air can’t rush in — it has nowhere to go. There are no cold drafts throughout the house because cold air isn’t leaking in anywhere. If you build your house according to passive house standards, it should take 1 hour 40 minutes for all the air in the building to leak out and be replaced by new air (equivalent to 0.6 air changes per hour) (it’s not exactly clear to me why this particular number is the target). A typical home will leak out all of it’s air in 30 minutes, equivalent to leaving the front door wide open!

You are getting sleepy and sickly

People need fresh air otherwise they’ll start to feel a little dizzy and tired due to the build up of CO2 and lack of oxygen. At 600 ppm of CO2, it starts to feel stuffy. At 1000 ppm, you’ll start to feel drowsy. Even measurements of typically constructed homes find that CO2 concentrations in the bedrooms at night with the windows closed will often reach over 2000 ppm! The more tightly sealed the house, the worse the situation gets. Furthermore, toxic gases offgasing from glues, coatings, paints and plastics will cause long term health problems if they are allowed to build up in the home.

The amazing ventilator brings in fresh air without wasting energy

A ventilation system is designed to address this problem, bringing in fresh air to every room while miraculously not wasting energy. It’s ingenious and surprisingly simple, probably one of the coolest energy saving ideas ever! The heart of the system is a type of heat exchanger, a recuperator, shown above, which takes cold air from outside and flows it through tiny pores. Each pore is surrounded by another set of pores flowing warm air from inside in the opposite direction. As the cold air passes by the warm air, almost all of the heat energy (up to 95%) transfers from the warm air to the cold air. It’s easy to think that the temperature of the two air flows might equilibrate to some intermediate temperature, but that’s not what happens.

The secret behind how it works

Imagine two tubes, side by side, shown above. One has cold air entering from outside, one has warm air entering from inside. Since the two tubes are in contact, they will have pretty much the same temperature at each cross section along the tubes, warmer near the inside and cooler near the outside. As air passes through the tubes, heat is transferred between the tubes in order to maintain the temperature profile along the length of both tubes. Notice how incoming cold air is heated up to room temperature and outgoing warm air is cooled down to the outside temperature. The efficiency of this process can be very high as long as the temperature difference between the two tubes is small and the thermal conductivity of the tubes is high. The same process runs in reverse in the summer.

The real life Zhender ComfoAir 200 HRV

The actual ventilator, called a heat recovery ventilator (HRV), looks like a big rectangular box with squid-like flexible ducts going everywhere. It’s installed in the attic space and the ducts are routed down to each room. The installation seemed to be pretty quick and easy — it took two guys about two days, although we ran into an issue.

Where should the ventilation vents go?

Above is an image of the ventilation vent in the kitchen. The architect and Zhender seemed to have two different philosophies about where each vent should go. The architect intended to place exhaust vents in the kitchen and the two bathrooms, and to place supply vents in the bedrooms and the main living area. Zhender seemed to think that supply vents weren’t needed in the main living area because the supply air from the upstairs bedrooms would filter downstairs. On one hand, the architect’s configuration seems like a better idea because the living area is a large space and it would be nice to have fresh air piped there directly. On the other hand, the bedrooms are the locations where CO2 buildup will be the greatest — small spaces, closed off all night, with people breathing inside — and therefore would benefit from as much fresh air as possible.

Three weeks later, we still appear to be at an impasse.

Sunday, May 11, 2014

Week 18 - Driveway complete, a little bit about the heat pump

The driveway is done, and little bits of progress have been made here and there on the roof trim, the building wrap, the upstairs ceiling. The piping for the heat pump was installed, and I’ll tell you a little bit about the amazing science behind the heat pump below.

Driveway is done, almost

The most expensive part of the entire project – the essentially unnecessary driveway – is almost done. Normally, you want to complete the driveway first, before embarking on construction, but our project got off to a late start and the winter prevented us from doing driveway work until now.

Above, a sheet of fabric is put down to separate the bottom layer of dirt from the top layer of “gravel” – that’s what the guys call it even though it looks like dirt to me. I suppose keeping the two layers separate helps stabilize the driveway.

The tiniest steamroller in the world is compacting the gravel — it’s adorable. After construction is complete, a final layer of “TRG” (I don’t know what it stands for) will be placed on top of the dirt. The TRG consists of small stones and sand that compacts well and can be plowed in the winter.

Now that the dirt is compacted around the home, delivery trucks don’t have to worry about getting stuck in the mud. My only concern is that I want to have a vegetable garden in front of the house and I’m worried that these vehicles compacting the soil will make the ground less amenable to cultivation. The driveway guys didn’t seem to think it was an issue.

Work on the roof trim

I’m not sure how he got up there, but somehow Don got started on the roof trim – see the white boards along the edge of the roof – without scaffolding or a ladder. When I asked him how he did it, he said: “I’m a monkey.” Next week, the metal seam roof will go up and Don is eager to borrow the scaffolding that the roofers will put up.

The R100 vaulted ceiling

You might remember that the ceiling upstairs will serve as the air and moisture barrier, with an astonishing 26 inches of blown-in cellulose as insulation on top of the ceiling (in the roof truss) giving an out-of-this-world R value of R100! The ZIP sheathing (in green) is placed face down on the underside of the roof truss. On the lower right hand side of the image, you can just barely see how the taped seal runs under the roof eave and attaches to the underside of the ceiling ZIP.

The building wrap

A delicate process, reminiscent of wrapping a Christmas present, is required to seal the moisture barrier around the window openings. First, the air barrier is taped at the edge between the window frame sheathing and the SIP OSB, shown above.

Second, the building wrap is taped to the window frame sheathing.

Getting the edges right is always the tricky part. An extra piece of tape goes right at the corner, running horizontally along the inside crease of the window frame.

The heat pump

I’ll talk more about the heat pump later when it actually gets installed, but for now, here’s a quick overview.

The heat pump provides both heating and air conditioning. We’ve chosen a mini-split, dual-zone, ductless model, meaning that there is an outdoor unit (a condenser) and two wall mounted indoor units (the evaporator cassettes) connected by two refrigerant lines (a gas line and a liquid line). This is different from central air conditioning or forced air heating where a central unit in the basement blows air through ducts to each room.

How does a heat pump work?

It’s a complicated process — a miracle of science — and you need to know a certain amount of thermodynamics to really understand it, but here’s how a heat pump (as well as your air conditioner and your refrigerator) works, in a nut shell.

The outdoor condenser, which houses a big noisy fan and a noisy compressor, serves to turn the refrigerant from a liquid to a gas (when in heating mode). The refrigerant is piped inside to each wall mounted indoor unit which simply blows air over the refrigerant — turning the refrigerant back to a liquid — and in the process extracts hot air. The cycle runs in reverse in air conditioning mode, turning the refrigerant from a gas to a liquid outside and extracting cool air when turning the refrigerant back to a gas. The process can move heat around at a seemingly impossible efficiency of almost 400%, way better than a normal furnace which might be 70% efficient.

The refrigerant lines

Here’s where the outdoor unit will go once the siding is finished. Those bunches of tubing puncturing the wall are the refrigerant lines.

Inside, the tubing snakes through the walls to the evaporator unit. A water line allows condensed water to drain away. Notice how much simpler it is to install these lines than it would be to install all of the duct work for a central heating or air conditioning unit.

Why don’t we need heat in every room?

The home is so well insulated and so tightly sealed that the temperature will be essentially even throughout the entire house. You just need to add a bit of hot air at one location and the heat will eventually propagate everywhere. We have one cassette upstairs for cooling in the summer and one unit downstairs for heating in the winter. The thermostat will be set to a given temperature window and a minimal amount of energy will be required to keep the temperature constant. A great feature of these heat pumps is that they can run at extremely low settings, quietly trickling in the tiniest amount of heat without having to noisily cycle on and off like a traditional system.