
Many thanks to GO Logic
I expended a tremendous amount of energy fussing with the floor plans of this home, much to the terror of my wonderful team of architects at GO Logic (Matt OMalia, Todd Boyd, and Svea Tullberg). Even though GO Logic provides off the shelf plans, I felt the need to demand certain changes to their plans, then promptly reversed those changes, only to eventually reinstate the original changes. In the end, we must have gone through at least six iterations of the floor plans. I owe many thanks to Matt, Todd and Svea for their amazing patience, professionalism and talent.
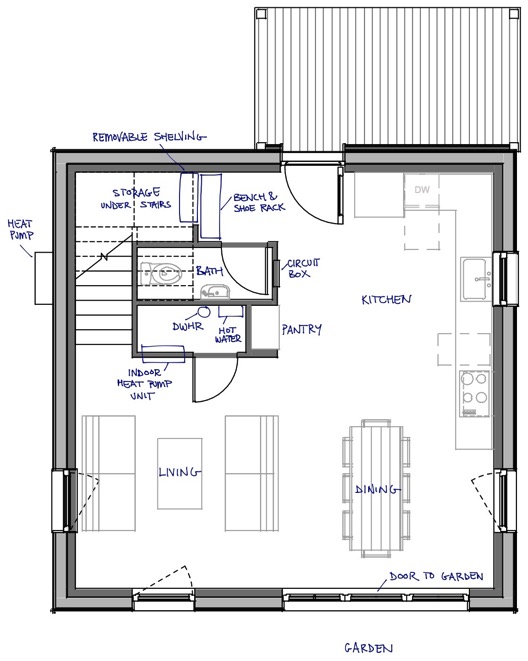
I learned a lot through the process and I thought I would share why I settled on the floor plan pictured above, which I believe is going to be terrific. Im including only the first floor in this post, the second floor is just as cool, but it will come later.
How to make a tiny home feel gigantic
I’m not an architect, but over the years I’ve noticed a few tricks that seem to make a small boxy space feel bigger than it really is. A few years ago, I attempted to use these principles in the layout of my lab at Mount Holyoke College, a small 600 sq ft research space for next generation solar cells — and the results were fantastic.
- Open up the floor plan as much as possible
- Make sure that the line of sight from any location extends as far as possible, preferably the full length of the house
- Use long straight lines or spaces wherever possible to simplify visual clutter and emphasize elongated forms
- Substitute sliding or double doors where possible, to be able to open up or close off the floor plan as needed
- Use well placed widows to illuminate all areas and open up smaller areas
Below, I’ll explain how I went about implemented these design rules.
Using 3D renderings to plan the layout
To get a feel for the floor plan, I generated 3D renderings of the interior using the mac app "Live Interior 3D Standard Edition." The app lets you draw a floor plan and then creates a 3D space that you can navigate through. I didn’t like the tacky color and faux realism of the renderings, so I used my iPad to trace some of the critical scenes as line drawings. The simple black and white lines might be a little difficult to look at at first, but they allow your mind to fill in the extraneous details.
The dininitchen room

The entrance leads directly into a single open space that serves as both the kitchen and dining space (above) — hence the dininitchen — a large area for gathering, cooking and eating. Three large windows behind the dinner table open up the space even further. The kitchen counter spans the left wall, with the induction cooktop and range hood almost spilling into the dinning area, blurring the distinction between the two rooms. A small built-in counter and shelving area to the right will serve as a pantry.

Off to the right of the entryway is the mud room and a half bath. A small bench to remove your shoes sits in front of a removable bookshelf, giving access to hidden storage under the stairs. An opening in the upper wall looks through to the staircase landing, helping to bring in light from the large window in the stairway. I wanted the bathroom to be tucked away from the kitchen and the living room, and to be easily accessible from the outside.

Looking from the dining room back at the entryway (above), notice how the kitchen counter follows an L shape along the wall — the layout allows for ample counter space while giving easy access to the front door, half bath (to the left of the door), the pantry, the dining area and the living area. The straight line of the countertop along the right wall lengthens the kitchen area, creating a sense of an usually large kitchen.
The closet off of the living area doubles as a storage space and utility room for two of the on-demand hot water heaters, the heat pump wall unit and the drain water heat recovery (DWHR) pipe.
An efficient dinner assembly line

The kitchen is laid out to maximize the efficiency of manufacturing dinner. The cooking process moves from left to right, starting with the vegetables in the fridge, moving to the counter, washing in the sink, cutting on the next counter, frying on the cooktop, and then serving at the dining table. Cleanup follows the same linear pathway in reverse: dirty dishes move from right to left; from the dining table, to the counter, to the sink, and into the dishwasher.
Handling sunlight throughout the day

One aspect that I love about this design is how sunlight moves throughout the space over the course of the day. The image above is looking at the living area from the kitchen.
The morning sun from the east filters into the kitchen window through the row of trees on the east property side. Breakfast at the table is warmed by the morning sun as well. Later in the day, the sun might be too strong at the dinner table — a tremendous amount of energy is captured by the three large south facing windows — but the living room offers a refuge with some protection from the sun. Afternoon sun keeps the living area illuminated continuously as the sun moves from the south facing window to the west facing window later in the day. In the afternoon, the kitchen will be free of sun, so cooking in the heat of the sun is not a problem.
Stay tuned to find out if the design actually works in practice!
Your blog on floor plan design is incredibly insightful! The way you break down space planning, functionality, and architectural flow is truly valuable for both designers and homeowners. A well-thought-out floor plan design ensures efficiency, aesthetics, and structural harmony. Your expertise in optimizing layouts with smart design choices is commendable. Looking forward to more of your knowledge—keep sharing such valuable content!
ReplyDeleteReally enjoyed this article — thanks for writing it! I found it very helpful. For anyone interested in creative services and inspiration, feel free to visit a site full of great ideas.
ReplyDeleteThis is a very well-written and informative post. I really appreciate how clearly the topic has been explained, especially the way key points are broken down in a simple and easy-to-understand manner. Content like this is very helpful for readers who want to gain practical knowledge rather than just surface-level information. Thank you for taking the time to create and share such valuable content. Looking forward to reading more posts like this in the future.
ReplyDeleteGreat content and very professional presentation. Your explanation about epoxy . flooring benefits and maintenance really adds value. It’s clear that your team has strong expertise in both residential and commercial flooring solutions.
ReplyDeleteThank you for sharing this valuable information. It provides great insights for anyone looking for reliable epoxy flooring in Chennai services. This resource is especially helpful for homeowners, businesses, and industries seeking durable, high-quality flooring solutions to enhance their spaces.
ReplyDeleteA thoughtful and detailed approach to floor planning that really shows how smart design choices—like open layouts, natural light flow, and efficient spatial planning—can make even a compact home feel expansive and functional. The focus on movement, usability, and visual continuity adds practical depth to the design process. For those planning to complement such layouts with durable and modern surfaces, VDF Flooring services in Hyderabad can also be worth considering for a clean, long-lasting finish.
ReplyDelete