Thursday, April 3, 2014

Eight myths about fossil fuel divestment

I’m giving a little talk at a fossil fuel divestment teach-in at Amherst College on Friday. There is an important way that the Potwine Passive House fits into the conversation, so I thought I would share my thought process here.

The concept of divestment is simple: don’t invest in the fossil fuel industry. The rationale is simple: don’t support a destructive and corrupt industry. Beyond the simple concept, a whole host of brilliant cascading effects lead me to believe that divestment is a great way to jump start the transition to a clean energy economy.

The complication arises when you factor in the industry-sponsored noise and misinformation that always overwhelms these types of political conversations. To counteract that noise, I started by trying to understand the points made by the industry in opposition to divestment. Then I compiled a top ten list of myths that seem to form the basis of that opposition.

Myth #1: It’s your fault, not the oil and gas industry’s

Who’s using electricity right now surfing the internet? Who drove around today, greedily burning fossil fuels? It wasn’t the oil and gas industry: they are simply providing a product that you want.

In fact, the public is not entirely responsible for our fossil fuel usage. It is true that we are all using dirty energy, but we don’t have a legitimate choice. The electricity and transportation infrastructure simply doesn’t exist right now to provide a fair choice between competing sources of energy.

Consider the paradox of Microsoft Office, a dominant product that is widely condemned and hasn’t improved in decades. It maintains its position in the market not by its merit, but by its ubiquity. We all use Microsoft Office even though there are more innovative alternatives (and have been for years) that would improve our lives and make us more productive, yet we can’t switch because it would involve a huge personal risk or inconvenience.

Likewise, the oil and gas industry offers a product that is scientifically proven to be causing irreparable harm, and yet we can’t switch to alternative energy sources — not because there aren’t better solutions, but because we are saddled with an entrenched fossil fuel infrastructure: our roads are made for cars, not bicycles; your building is heated with fossil fuels regardless of how much you turn down the heat; and if you wanted to buy clean electricity for your home, you would have to pay more.

Myth #2: Fossil fuels benefit society

Look around at the amazing achievements of civilization: hospitals are using electricity to cure people; buses are using gasoline to drive kids to school; construction workers are being hired to build pipelines; and so on. You want to destroy our economy and put innocent people out of work by making it harder to burn fossil fuels?

The perception that societal progress is due to our usage of fossil fuels is incorrect. Fossil fuels are inefficient, destructive and marginal sources of energy, retarding the advancement of society and costing far more than their economic benefit.

Few of us know the depth to which fossil fuel usage is horribly inefficient. The energy efficiency of an incandescent light bulb, powered by a fossil fuel power plant, is only 1%! In other words, 99% of the energy of the natural gas or coal that went into the power plant is wasted as rejected heat, transmission losses from the power plant and heat loss in the light bulb itself. Likewise, the energy efficiency of a gasoline powered car is only 1%! In other words, 99% of the energy of the oil that goes into the gas tank is lost in the engine, in accelerating and braking, in friction and in moving the entire car rather than just the driver. These inefficiencies are, unfortunately, largely unavoidable — a fundamental consequence of using heat to propel a generator or an automobile engine.

Not only is fossil fuel usage much more wasteful than most people think, it’s also one of the greatest public health threats on the planet. The combustion process releases small particulates and toxic impurities bound up in the raw fuel stock, causing disease, cancer and ultimately leading to 50,000 deaths each year in the United States alone and $150 billion in health costs each year. An economic analysis found that the health impacts of coal electricity cost society twice as much as the value added to society.

Myth #3: We can’t live without fossil fuels

It’s useless to lament the inefficiency and widespread public health threat of fossil fuels because no form of renewable energy can support our lifestyle or lift the world’s poor out of poverty.

In reality, the technology exists to dramatically reduce how much energy we waste, and the available wind and solar energy resources are sufficient to fill the remaining gap. LED lights powered by solar electricity are nearly 80% efficient, 80 times more efficient than an incandescent light bulb. Electric cars are nearly 10% efficient, ten times more efficient than a gasoline powered car. An electric heat pump is twice as efficient as a gas furnace. These huge efficiency improvements are mostly due to the fact that electron-based technologies are not subject to the same heat losses of combustion-based technologies.

Even more improvements in renewable energy and storage technologies are on the horizon, and will certainly help in the future, but they are not essential today. We are living in an exciting time where many long sought after renewable and efficiency technologies are rapidly maturing. The cost of renewable energy has already fallen dramatically as it reaches scale. In Texas, solar electricity is cheaper than natural gas electricity. In Massachusetts, the return on investment for solar panels is twice that of the stock market.

To help prove the point, I am building an affordable home that doesn’t use a single drop of fossil fuels, and will be powered entirely by the sun. A remarkable combination of solar heating, efficient components and super-insulation help reduce the energy consumption of the home by a factor of 8 compared to the average Massachusetts home. Because the home is so efficient, solar panels cover only a small fraction of the roof area, leaving plenty of room for extra solar panels to charge an electric car. Using so little electricity, backup battery systems are economically feasible, allowing the home to be disconnect from the transmission grid, an expensive source of inefficiency.

Underlying the home’s astonishing energy savings is the Passivhaus design method, an assortment of techniques, technologies and guidelines needed to obtain such a high level of efficiency. The Passivhaus method is not a crazy unproven idea: decades of research underpin the method; tens of thousands of successful homes and buildings have already been built; and, in many cities in Germany, the standard has been adopted as the building code. These tremendous energy savings can be obtained in nearly any building, often saving costs in the long run. My biggest surprise with the project has been that going zero energy isn’t the hard part. Making decisions without adequate information, following up on loose ends, planning, communicating, getting permitting and getting a loan were the difficult parts. Making the home zero energy was easy. As long as you commit to it, living without fossil fuels is easy.

Myth #4: Existing institutions will lead the way

You’ve seen the commercials. Chevron, ExxonMobile, BP are investing millions in alternative energy. Your utility company is helping people weatherize their homes. Your college is building a LEED certified building. Our institutions have made us into a great country and they will lead the way to clean energy.

The simple fact is that few large governmental, educational or corporate institutions are investing aggressively in renewable energy and energy efficiency. Investment in renewables is typically more of a public relations tactic than a truly disruptive mobilization. Most energy companies invest less than 1% of their expenditures on renewables. There is no evidence that all those LEED certified buildings on campus actually save energy.

Our institutions are not willing to invest in renewables and energy efficiency for the simple reason that they are accustomed to and reliant on fossil fuels and therefore have no incentive to lead the shift to renewables. History tells us that large organizations are often incapable of quickly pivoting in a new direction. We cannot depend on them to willingly give up revenue, retrain their work force, or overhaul their operations for the greater good of the planet — unless they are compelled to do so.

Myth #5: Don’t blame people in the oil and gas industry

Many hardworking folks are employed by the oil and gas industry. It is unfair to blame them for the unanticipated side effects of fossil fuels and the failure of solar and wind to economically compete with fossil fuels.

Here, we should be careful to distinguish between employees who are doing nothing wrong and decision-makers at the executive level who are knowingly stifling renewable energy by lobbying against renewable energy and energy efficiency incentives, lobbying against public transportation, lobbying against oil and gas regulation, securing lucrative tax breaks and subsidies, and creating a vast network of think tanks and organizations that spread an incredible amount of misinformation about the science of climate change. There is no legal way to compel oil and gas companies to operate their businesses in an ethical manner. Public pressure, however, can be an effective way to reform an industry.

Myth #6: Divestment won’t make a difference

If colleges and universities divest from fossil fuels, the total sum of those investments will not make a significant difference in the industry’s ability to access capital. No one can honestly believe that the most powerful companies in the world will voluntarily relinquish the trillions of dollars in fossil fuel resources that they control. Publicly traded fossil fuel companies control a small fraction of the world’s proven reserves anyway.

Divestment is not the only step needed to achieve a clean energy future. It is a brilliant starting point, a necessary first step that might actually be able to achieve a goal that is seemingly unattainable. The divestment movement is nominally about the moral authority of colleges and universities. However, a deeper significance exists: the ability to imagine a world without fossil fuels. Eliminating one’s financial dependency on fossil fuels helps break through a powerful psychological barrier: the belief that a dependency on fossil fuels is necessary. This is the true power of divestment. Colleges and universities who divest — and along the way purge industry advocates from their board of trustees and the administration — will be free to overhaul their operations, their curriculum and their research agendas and allocate resources in a way that is commensurate with the magnitude of the climate crisis, the single greatest challenge of our time.

A second goal of divestment is to build a movement that can exert pressure on the fossil fuel industry to stop spreading misinformation and stop altering the political process. Historically, large student movements have provided an effective medium for raising the profile of important issues that aren’t receiving the attention they deserve in the wider public discourse. The anti-war movement gained early traction on college campuses, and more recently the Occupy movement demonstrated how rapidly a student movement can affect the national conversation. Marginalizing the fossil fuel industry’s disinformation and lobbying campaigns will eliminate a crucial impediment to renewables.

The only solution to the climate crisis is to lower the cost of renewable energy below that of fossil fuels, to the extent that fossil fuel reserves are no longer economically accessible. Fossil fuels are global commodities, as are solar panels: a drop in the price of solar panels in a single country will propagate to other countries across the world. Forward thinking pricing schemes for solar energy in Germany over the past decade almost singlehandedly led to the resurgence of the solar industry and an astonishing drop in prices by one half. Over the past couple of years, China has aggressively subsidized its nascent solar industry, cutting worldwide solar panel costs in half again. These price cuts are permanent, a function of manufacturing scaling laws. Imagine what could be done if the fossil fuel industry lifted its strangle hold on the political process in the US.

Myth #7: You must first green your campus

How can a college claim the moral high ground by divesting from fossil fuels while continuing to use tremendous amounts of fossil fuels in its own daily operations?

It is perfectly rational to not eliminate your own consumption while you attempt to change the system that makes it difficult to eliminate your own consumption in the first place.

Myth #8: We can’t afford to divest

In these difficult financial times, when colleges and universities are struggling to cut costs while the price of a college education is at an all time high, it is dangerous to risk the financial stability of the endowment in order to further a single political position. [Similarly, a pre-recession version of this sentiment might have read:] In an increasingly competitive field of colleges, it would be irresponsible to hog-tie our highly skilled financial managers and risk slowing the growth of our endowment, possibly putting the college at a financial disadvantage.

The misconception here begins with the fact that money managers do not simply remove investments from a portfolio — they must rebalance the portfolio by substituting stocks that behave similarly. Energy stocks tend to hold their value better in hard times, so one must find investments that do the same, which is apparently easy to do. In the end, there is essentially no difference between the two portfolios in terms of their returns.

Sunday, March 30, 2014

Week 12 - Second floor framing and a look at the beaver activity

Don, the carpenter, made tremendous progress again this week, especially considering the rainy and windy conditions. It’s such an exciting time. The house looks totally different every day. At this point, most of the second floor framing is in place.

I got to climb up on the second floor and have a look around. It was thrilling to finally be able to see the surrounding landscape from the second floor. I’ve been so curious to check out the window placement on the second floor, to see for myself what scenic landscapes are perfectly framed by the windows, and, sadly, what landscapes are obscured by the walls.

View from the second floor master bedroom

In the shot above, you are looking through the three master bedroom windows. The scene is framed wonderfully, I think. I love the straight driveway, lined with a row of trees, heading diagonally across the frame, drawing the eye toward the mountain. It’s more of an Amherst suburban feel, with roads, houses, fields and a mountain in the background. It’s a little weird that bedroom is exposed to the road, however. Maybe this room will have to be an office. I’m jealous of my neighbors who live on the south side of the road.

I can see Russia from my HOUSE!

Looking north, out over the top of the stairs beyond the window in the stairwell, I was slack-jawed — the view of the natural landscape is absolutely spectacular and the wildlife viewing opportunities are going to be amazing. You can’t quite get a sense for the detail and the intricacy of the landscape without a better zoomed-in image, but it feels like you are a hundred feet up in the air and you can see forever. Beyond the excavator, one can see (not in this image) the northern most beaver dam. Off to the left are apple trees, wetland, a beaver lodge, beavers swimming in the water and a beaver dam.

I shouldn’t have built a passive house

If you read my last post, you know that I’ve struggled with the limitations imposed by Passivhaus on north windows. Climbing up onto the second floor, I couldn’t escape the feeling that I have made a huge mistake. I should have gone with 100% glass walls. The best views are going to be completely blocked once the SIPs are in place. This spot calls for a viewing tower, not a demonstration to the world of an affordable and charming zero energy house. I suddenly dreaded the day when the SIPs are put up and the expansive 360 degree views will be gone. If only Amherst was located in the southern hemisphere.

I’ve got a plan

While I was up there, I hatched a plan — a sort of compromise that will allow me to salvage my energy efficiency fanaticism while still being able to enjoy the vistas that I feel like I suddenly can’t live without: I’ll put up a second story deck. All I need is a window door, right at the top of the stairs, to the left. The deck will run along the left wall toward the back and wrap around the back side of the house. The super-insulated enclosure is preserved, and if you need to see two raptors fighting (this happened), you can go out on the deck. I can’t afford to modify the project right now, so it will have to be an add on at a later time. Hopefully, GO Logic will think it’s possible.

The magical wetlands in the winter

Now that the snow has melted, I tried to capture the wetlands in their lovely wintery state of dormancy. I wanted you to see up close what I’m talking about. It’s also neat to see the remarkable transformation the beavers have wrought over the past year and a half — an engineering marvel and an expansion of habitat for aquatic wildlife — but at the cost of what once was a wonderful portion of the town trail, a treasure to the community.

Definitely a beaver lodge

Check out this great peek at the beaver lodge! It’s the huge pile of sticks in the center of the shot. When I walked up to the lodge, the beaver popped right out and swam around for a bit. I can’t believe it took us so long to find the lodge — it’s in plain sight and you can literally walk right up to it. I bet the brush must have been pretty thick before it died down in the winter.

Beavers build their lodges with underwater openings as the only entry and exist points. You can see one of the entryways at the base of the tree. Another entrance is located on the other side of the lodge, upstream (the width of the lodge spans a narrow peninsula). The underwater entrance protects the beavers from intruders like bears and bobcats who apparently can’t figure out how to get in from underneath. Also, the underwater opening gives beavers access to the water when everything is frozen over and covered in snow.

Flooded wetland

Click on the panorama to see the large version. You are looking east toward the house (it’s up on the hill next to the excavator — you’ll have to zoom in). The beaver lodge is on the right, out of view. The old footbridge is on the left — again, zooming needed. The massive beaver dam is also on the left, although it is hard to distinguish from this angle. Notice how the brook snakes through the area, but don’t be fooled: the whole plain is flooded. You are seeing the top of the marsh grasses that have died and fallen over.

For comparison, the above image was taken a year and a half ago. Now, the water level comes right up to the bridge, at times nearly submerging it.

Another dam downstream

Beavers raise the water level in steps, by constructing multiple dams. Here’s another flooded area and dam, downstream from the previous image. Notice the huge pile of sticks and the dramatic decrease in the water level. The image is facing south — you can see Mount Norwottuck and the house in the distance. Neighbor Jesse tells me that this dam has been here for a long time. The dead trees are a sign of this, as well. The water level is still pretty high in front of the dam, so I think there is another active dam further downstream. The area is difficult to navigate so I haven’t been able to get in there and look around. I need a some sort of a miniature boat, like an Inuit kayak.

Sunday, March 23, 2014

Floor Plans 2


In a previous post, we talked about how the design of the first floor layout helps make the home feel bigger than it really is. The upstairs is a different story — we need to fit three bedrooms, a bathroom, and a washer/dryer into a small space. There’s no way to open everything up: it’s going to feel tight no matter what. The question is whether we can arrange everything to use space efficiently while keeping the floor plan as open as possible.

Much like the first floor layout, GO Logic provided fantastic off-the-shelf floor plans, and I couldn’t help but to shift a couple of things around.

Double doors at the top of the stairs and a window


I love the feeling of walking into a well-designed home for the first time. Your viewpoint is obstructed by something — maybe stairs or walls — then, bam!, you see straight ahead onto an interesting space, wide open and well-lit. It’s a great feeling: emerging from a tight space to observe a striking view.


I wanted to go for a similar feeling with the stairway, in a much more modest way. The image above gives the perspective as you walk up the staircase and look straight ahead toward the study. We added double doors to the study entrance so that the top of the staircase would feel expansive, and so that you get an unobstructed view out the window in the background. The small landing at the top of the stairs gets to function as an extension of the study rather than a closed off space.

A lovely view north, but no north-facing windows?


The view north overlooks an apple orchard, marshland, great blue herons, egrets, hawks, beavers and more — it’s awesome. The property is a rare treasure for its proximity to wetland, conservation land and hiking trails. But north-facing windows are heat losers, with no solar gain, and should be minimized in passive houses. Should I sacrifice the passive house design principles in order take full advantage of the surrounding views of wildlife and conservation land?

Looking out over the property, the architect, Matt O’Malia, turned to me and said: “You know, we don’t have to build a passive house. We can face north. It will be a house that performs well, but doesn’t meet passive house standards.” I thought about it for a bit. In the end, I couldn’t give up two things: the bragging rights of a passive house and the wonderful feeling of having abundant sunlight streaming into a room.

Some north-facing windows are OK


As a compromise, we increased the size of the north facing window over the stairs and added a west-facing window at the landing, but kept our adherence to the passive house standard. Our Kneer-Südfenster windows are so good that these changes didn’t incurring much of a heat demand penalty anyway.

The image above shows the stairway landing, as seen from the study. The west-facing window (on the left) will be a great spot for wildlife viewing and watching the sunset while also serving to illuminate the hallway. The north-facing window over the stairs is sufficiently large to provide a nice view from the landing.

More storage or more views?


The built-in shelving is one aspect that I’m still on the fence about. On the one hand, storage space is limited and I’d like to use the space at the top of the stairs effectively. On the other hand, the shelving is blocking the view to the north window from the landing and the study, and might be closing off the top of the stairs awkwardly. The compromise that the builder and I came up with is to wait until the second floor and the walls are up, then have a look around and see if we can come to a decision.


Here’s a look at the same perspective as above, but with the shelving removed, leaving a direct line of sight to the rear window. What do you think? Why sacrifice the heat loss through a large northern window and yet not take full advantage of the view out that window?

Small washer/dryers save a lot of space


Go to Best Buy or Home Depot and look at the washer-dryers; they’re enormous! How am I going to find a place for these behemoths? Luckily, the Europeans came to the rescue, once again.


These are the Miele washer/dryers. They’re compact, efficient, yet accommodate a surprising volume of laundry, and they look neat. They can fit right into a hallway without taking up too much space. The downside is that they are unbelievably expensive. I ultimately decided it was worth it.


The image above is looking down the hallway back toward the landing and the west-facing window. Notice how the washer/dryer stack is flush with the wall — no doors or a separate laundry room to needlessly take up space. The bathroom is off to the right. Both the washer and the shower are fed hot water from a single on-demand water heat located in the utility closet on the first floor, right beneath the hallway. The close proximity of the water heater, the washer and the shower helps reduce the length of the hot water pipes, giving instant hot water and reducing wasted heat.

I also love the fact that the west facing window at the end of the hallway will let afternoon light percolate deep into the hallway. It’ll be a great spot to watch the sunset. In the summer, however, there will be a cooling load penalty: the afternoon sunlight will warm up the home somewhat. I think the window adds so much to the hallway, however, that I’m willing to use a little more energy in the summer to cool the home.

Extra windows for the master bedroom versus overheating?


The architect had originally planned for two windows in the master bedroom, having determined the right amount of south facing window area needed to heat the upstairs while avoiding overheating. But I argued that overheating in the bedroom was less of a concern for me than to have a wide open view, a more open bedroom and more of a connection to the outdoors. A midday nap in a warm bedroom on a sunny day doesn’t sound that bad to me, anyway. I don’t tend to use the bedroom during the day, though, so I think we’ll be OK even if overheating is an issue.

An open feeling in a small bedroom


A couple of neat tricks help make the bedrooms more feel spacious even through they are tiny (the master bedroom is only 136 sq ft while the typical American master bedroom is 256 sq ft). First, vaulted ceilings provide extra space overhead and also look cool. Second, the closet doors were removed in favor of an open closet with a closet system. Third, the position of the door to the third bedroom across the hall allows you to peer across the full width of the home when sitting in the reading chair, the viewpoint from which the above image was drawn.

The walls on the second floor are going up this week, so it won’t be long until we get to see how it all comes together!

Saturday, March 22, 2014

Week 11 - First floor framing completed

Don, the carpenter, got a lot of work done this week. He said he had help for one day, but I’m impressed. The second floor subflooring is in place and you can see the boards for the second floor walls up on the roof. I forgot to ask how they got up there, but I’m guessing they used the excavator. I took some pictures earlier in the week as everything came together — it’s neat to see how the frame is setup.

Beams and joists

Starting with the ceiling over the kitchen, a laminated veneer lumber (LVL) beam provides support for the horizontal 2 x 8 boards, called joists, onto which the second floor flooring will be placed.

Looking from the front door, you can see how the LVL beam spans the width of the kitchen. Off in the distance, by the way, is Mount Norwottuck, directly accessible from the trail across the street. The diagonal posts are there for stability — they’re temporary.

Subfloor is done

By Tuesday, most of the joists were in place and Don was getting started on the subflooring, which consists of OSB panels. By Friday, he was all done.

Beams over windows

Another LVL beam is placed over the large windows in the dining room, to keep pressure off the windows — you don’t want them to buckle over time and loose their seal.

Joist brackets

Another way to support the joists is to use metal joist brackets, shown above. This is right over the stairs. They don’t look that sturdy, but I guess they do the trick.

Double joists for the bathroom

The image above shows the double joists underneath the bathroom. See how the joists look thicker: there are two of them. If the bathtub is full of water, you’ve installed tile everywhere, and ten people are crowded inside to see how nice it looks, you want extra support under the bathroom. Also, bathrooms tend to have pipes under the floor, requiring holes through the joists, which can compromise the strength of a single joist.

Floor joist blocking

The little 2 x 8 boards running perpendicular to the joists are called blocking. They serve to even out the floor load and to provide something solid to nail the upstair wall into. Staggering the blocking allows you to nail straight through the joist into the blocking.

Saturday, March 15, 2014

Week 10 - First floor framing

Don, the carpenter, was able to get a bunch of work done early in the week before the weather turned cold and stormy. He’s basically got most of the first floor framing done.

Interior framing first, then exterior walls will go up

Last time I talked about how the walls for the home are SIPs walls — prefabricated walls panels. So now why is the carpenter putting up walls the old fashioned way? Let me explain.

The architect has designed the walls to consist of two components: the exterior walls, which are the SIPs walls, and the interior walls, which are constructed onsite with 2 x 6 lumber. The interior walls will contain extra insulation and provide a frame onto which the SIPs can be attached. Also, the first floor walls will hold up the second floor. Once the first and second floor framing is complete — probably in 2–3 weeks — the SIPs will be installed with a crane and attached to the interior walls.

Why two walls?

I’m not exactly sure why the architect decided to go this route, but the hybrid interior-exterior wall design seems to have a number of advantages. First, the interior wall increases the total wall thickness, boosting the R Value significantly. I’m assuming that it would be tremendously difficult and expensive to fabricate and install a wall panel that was 14 inches thick — the total thickness of both walls. Second, the interior wall will accommodate plumbing, wires, outlets and light switches, so that the integrity of the outside wall can remain intact without needing to drill channels in multiple locations. Third, the interior wall assembly is vastly simpler than a conventionally framed wall because it only contains studs and plates — it doesn’t need nogging for extra support.

Monday, March 10, 2014

Week 9 - SIPs wall panels are here!

img-alternative-text

I got a text on Friday from my trusted neighbor-spy Jesse saying "SIPs just rolled in!" I was out of town, but on Sunday I got to check them out — notice the stacked, thick white panels sitting on the ground. Also, the tent for the concrete came down, so I got to check out the concrete in the full sunlight. It looks good — a huge relief!

SIPs are awesome!

image-2363

The image above shows a stack of five Structural Insulated Panels (SIPs), soon to be lifted by a crane and installed as the walls of the building. I mentioned SIPs in my overview post a while back, but let me tell you a little bit more about why these types of walls are such an important part of energy efficient design.

Why make walls in a factory?

img-alternative-text

Youve probably seen a traditionally framed wall at a construction site, a web of 2 x 4 or 2 x 6 lumber going in every direction. Long horizontal boards, called plates, are placed along the top and bottom of the wall, vertical boards, called studs, run the height of the wall and little horizontal pieces, called nogging, are placed in between the studs. You have to be careful to lay out everything so that the window and door openings are taken into account and adequately reinforced. Plywood goes on the outside once the lumber is in place.

img-alternative-text

On the other hand, our SIPs walls are fabricated in a factory in Vermont. The panels are huge, consisting of a single 8 inch thick slab of EPS foam sandwiched between two long pieces of oriented strand boards (OSB), and measuring 4 feet wide and two stories tall. The foam and OSB are held together with urethane glue.

Fabricating the panels in an indoor setting adds a number of advantages: automated machinery cuts and laminates the panels quickly and precisely without generating much waste; the shape and layout of the panels are digitally uploaded to the manufacturing equipment without the need to interpret drawings onsite; the quality of the panels can be tightly controlled and verified before shipping; and construction times are shorter because the panels can be made while the foundation is being constructed.

The end result is a monolithic panel that is airtight and super-insulated. The panels interlock, but you still have to seal the edges with tape. Although some builders use only the panels themselves as the walls, we will be adding 2 x 6 interior wall studs and blown-in fiberglass insulation to increase the R value of the walls and to provide space for electrical wiring.

youtube

In the video above, Matt OMalia describes the process of installing the SIPs at the GO Home.

Concrete floor looks great!

img-alternative-text

After a worrying about the concrete floor last week, I was excited to see how the surface of the concrete turned out. I think it looks great – it has a nice matt finish to it, some interesting texture and the color is pleasing. I guess it will add more of an industrial feel to the home rather than a fancy shiny granite look, which is cool — maybe even better than a polish.

This is better than polished concrete

There appear to be multiple definitions of "polished" concrete. The architect and builder told me that the actual grinding part of the polish – the part that gives it its mirror like shine – wasnt planned for, or included in the price. That step can be done later, if desired, but it would add a substantial amount to the cost of the floor. In the end, I think the builder went with the best of all possible options. Its the economical option because the expensive grinding process was omitted. Its the healthy option because we didnt use a chemical sealer. Plus, its the durable option because we used a densifier to harden the concrete.

img-alternative-text

The image above is a closeup of the concrete control joint, a cut in the concrete that promotes cracking underneath the joint, instead of along the surface. You can also get a better sense for the texture of the surface — its pretty smooth to the touch. Im not sure what part of the texture will wipe off when its cleaned, but Im feeling good about it, regardless.

Backfilled around the perimeter

img-alternative-text

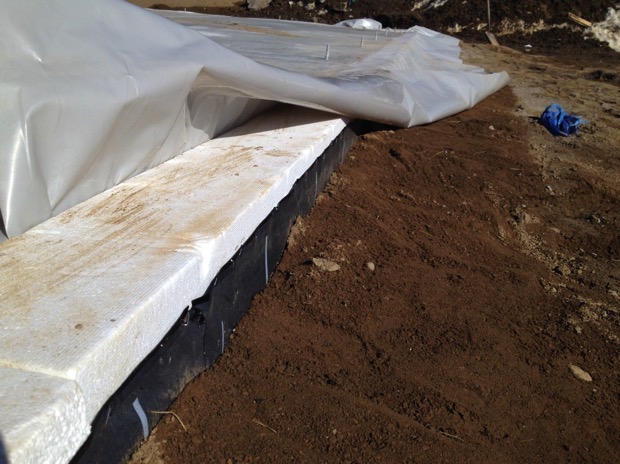
Heres an image of the EPS foam, having been lined with a black covering — the ice and water shield — and backfilled with dirt. Buried under the dirt is another EPS panel, a "wing" that serves to insulate the ground under the wing from frost. The gray plastic is the poly vapor barrier that forms a continuous seal underneath the concrete.

Sunday, March 2, 2014

Week 8 - Concrete poured, beaver lodge located

img-alternative-text

Suddenly, we have made major progress this week, despite the continued frigid temperatures! On Monday, the rebar was set into place and on Tuesday the concrete was poured. Everything seems to be going well, but not without some misunderstanding. Also, I think Ive finally located the beaver lodge.

Pouring the concrete

image-9

When I showed up, the first concrete truck had just finished pouring its portion of the concrete and the guys were spreading out the concrete and leveling it. The second truck was on it’s way, but I had to take off.

Power troweling the concrete all night

img-alternative-text

Later that night, I dropped in to find the concrete guy floating the concrete, using the power troweler on the right. After waiting for the concrete to cure until it was hard enough to walk on, he repeatedly ran the power troweler over the concrete until he was satisfied with the sheen. The process apparently took all night — it had to be done before the concrete hardened any further. Hopefully, the neighbors weren’t bothered by the sound of the generator.

img-alternative-text

Here’s the floor in the morning. It looks smoother, but what’s all that white stuff?

Is this polished concrete?

The concrete process seems to be deviating from what I expected, and I’m not exactly sure what is going on. We had decided on polished concrete floors — an agonizing decision because of a the $5/sq ft premium over traditional concrete, with a total cost of $15.6/sq ft. For comparison, $14/sq ft is the cost of a high-end wood floor. The concrete doubles as the foundation, so it’s not a fair comparison, but still — it’s not cheap.

Polished concrete has the advantage that it does not require chemical sealers or annual waxing, and apparently the look is better. As I understood it, the process for polished concrete follows these steps:

  1. Once the concrete hardens, it is ground down to a smooth finish, exposing the aggregates in the concrete.
  2. A densifier is applied to the concrete to harden it, providing a hard surface that does not need maintenance. The densifier is a non-toxic mixture of silicic acid, potassium salt and water that reacts with the concrete to produce calcium silicate hydrate, a super-strong material.
  3. The hardened concrete is ground down to a progressively finer finish until the desired polish is achieved.

It looks like the concrete guy is actually going down a much different route, which might end up fine, but I’m worried about getting a floor that looks like a basement rather than something that suits a living room. One aspect that concerns me is the troweling process, described above. Apparently this process buries the aggregates under the surface of the concrete, giving a more homogenous appearance that is typical of a concrete floor. But the texture that the aggregates provide seems to be partly what makes polished concrete look so good. I’m crossing my fingers that it will turn out OK. I’m also wondering where the $5/sq ft premium went.

img-alternative-text

On Friday, after a couple of days of curing, the densifier was applied. I’m hoping that those scuff marks are not permanently engrained in the concrete. I guess there’s no turning back now.

img-alternative-text

Here’s one of the two massive propane burners, running 24/7 for a week now to keep the concrete warm.

Did I find the beaver lodge?

img-alternative-text

To relieve my worry about the concrete floor, I decided to go check on the beavers. I think I found their lodge, but I’m bothered by the fact that it is so close to the trail — it seems like I would have seen it earlier. Notice the pile of sticks covered in snow, right at the center of the photo. It could be a random pile of sticks, but the location makes me think it is a lodge. Look at how the lodge is situated right at the crux of the stream’s oxbow — this is exactly the same positioning as an abandoned beaver lodge further down stream. My guess is that theyve installed two entryways, one downstream and one upstream.

img-alternative-text

The beaver dam is still holding up well. This most extensive dam in the area. Starting from the lower right side of the image, the dam runs diagonally and then continues to zig zig into the distance, making its way to the hillside that you can see in the background — a massive work of engineering.