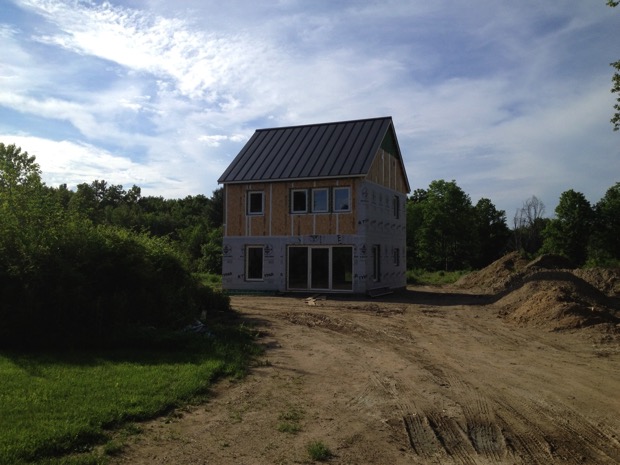
So much for my plan to update the blog every week. Ive been super busy, but at the same time the project slowed down to a crawl, so Ive bunched up the past month and a half into a single post. The builder had other jobs. We were waiting for this and that. Sadly, carpenter Don came down with lyme disease, but hes doing better already after a round of antibiotics. After a month and a half, we got the roof on (1 day), the blower door test done (2 hours), the rough plumbing and electricals (3 days), the insulation (3 days), the drywall mostly up (1 week) and the exterior window framing mostly done (lots of time).
Week 22 - Standing seam roof is beautiful, mostly
At first, the standing seam roof looked amazing, with a deep rich grey color and thin sleek seams widely placed apart. I was glad we went with the more expensive 24 gauge steal which is thicker, formed in the field, and doesnt have the more industrial looking ribbing.
But then I noticed that when the sun is high up in the sky, which happens to be a common occurrence, the roof material looks like a tin can about to crumple – kind of a cheap look for an expensive roof. Apparently, this is a common occurrence with standing seam roofs, a trade off for the extra durability and sleek look. By and large, the roof looks great from almost every angle, just not from the road during midday.
Week 23 - The blower door test, the ultimate reckoning
The blower door test is like a baseball pitchers earned run average (ERA), its the ultimate measure of the builders prowess. Everyone was anxious about how the test would turn out.
A critical part of the passive house concept is to seal the envelope of the building in order to prevent hot air from seeping out, and to avoid drafts of cold air from seeping in, which tends to be unpleasant in the winter. To verify the degree to which the house has been sealed up, we need to measure the flow of air passing through all of the little unsealed cracks in the envelope.
To do this, we replace the front door with a fan and use it to blow air out of the house, and then measure how much air passes through the fan. The flow of air passing through the fan must be equal to the flow of air through all the little breaks in the envelope; there is no other place for the air to go. Presumably (Im guessing here), the fan is calibrated such that the air flow can be determined from the fan speed, at a given pressure between the inside and the outside. The measured flow is not necessarily the real air leakage, however. The standard pressure used is 50 Pascals, which is substantially greater than you would normally get from wind or your ventilation system, but it serves to make sure everyone is testing under the same conditions.
Plugging up holes around the HRV
We hooked everything up and started measuring the flow, then ran around the house feeling for drafts to plug up. We found a couple of spots in the attic around the HRV where the exhaust and inlet ducts penetrate the air barrier. It seems that the HRV got positioned too close to the wall so it was difficult to tape around the duct adequately. Also, the angle at which the ducts cross the sheathing is not ideal. Its always tough dealing with subcontractors: they dont have much interest in making sure the air barrier will be easy to seal.
A spectacular "air changes" (ach) number, then a good ach
After plugging everything up, we got a final flow measurement, in units of cubic feet per minute (cfm). The certification guy (Mark Newey, of CET) then calculated the number of "air changes" per hour, meaning the fraction of air that would leak out of the house during an hour, arriving at 0.23 ach at 50 Pascals, an unbelievably awesome number! The passivhaus target is 0.6 ach and almost nobody gets down near 0.2 ach. We high-fived each other and went home. Only later — when I relayed the information to the architect — did we realize that we were using the wrong number for the volume of the home. In reality, the result came to 0.34 ach, still an excellent number and a huge testament to the amazing craftsmanship of Don the carpenter and the rest of the Integrity team.
Week 24 - The blown-in fiberglass insulation
At the last minute, GO Logic was running through their heating demand calculations and realized that the home wasn’t going to meet the 15 kWh/m2 per year goal set by Passivhaus. We decided to increase the thickness of the inner stud wall from 4" to 6" and to use blown-in fiberglass instead of blown-in cellulose, for its better R value. Cellulose is often recycled, but there is some concern about the fact that it is treated with chemical fire retardants, so I was glad to not have to worry about that. The fiberglass is made of recycled glass and does not need to be treated with fire retardants.
The first step is to put up a mesh consisting of a teflon paper type material.
The fiberglass is blown in through holes in the mesh until the stud cavity is completely filled and the fiberglass is compacted, creating a interesting artsy wall with a quilted look.
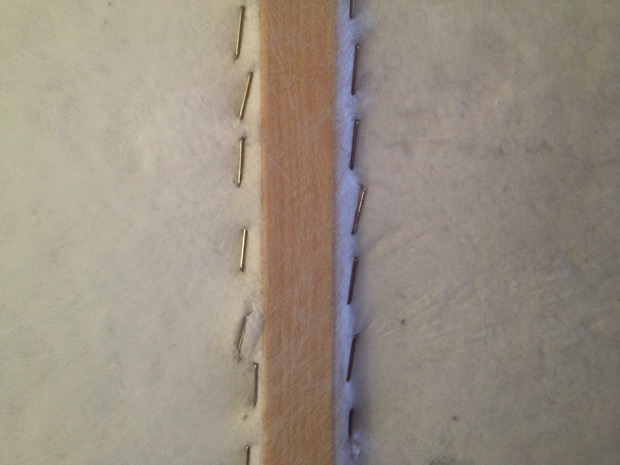
To keep the mesh from bulging outward, it is stapled at the studs, which makes for a cool stitch pattern. Too bad the walls are going to get covered with drywall.
Week 25 - What’s the purpose of drywall?
No offense to the drywall crew, but drywall strikes me as completely useless. The amount of material used is enormous. It’s bulky and heavy and takes forever to install. It uses up space and, after it was installed, it made the rooms feel smaller. Why not just tack up a thin panelling material?
It’s a good thing we enlarged the window to the stairway, and also good that it’s an operable window, otherwise it would have been impossible to get the massive drywall panels upstairs. Passing them through the window was still a major exercise. There must have been four or five loads, each as massive as the one you can see in the image above.
The drywall really makes the rooms feel closed-in and small, but apparently once the rooms get painted they open up again. I’m keeping my fingers crossed.
Week 26 - Finishing the drywall
Finishing the drywall took one guy over a week, being careful with the corners and sanding down everything nicely.
The upstairs hallway is starting to feel like a super nice spot in the home. It feels luxuriously large for a small home — almost too large — but I think we made the right decision to keep it big. For a while I played with tightening up the hallway to give more room for the bedrooms. In the end, the bedrooms indeed came out tiny, but that’s fine. For someone like me who struggles with insomnia, you want to keep your bedroom for sleeping, a dedicated space without distractions. The hallway, on the other hand, gets a lot more usage and impacts the feel of the home in a greater way: it’s your first impression as you walk up the stairs and it’s a common space that gets a lot of traffic.
Here’s a look at how sharp the drywall edges came out, which really helps give the windows a crisp modern look.
Week 27 - Window framing, starting the siding
Most of the week was spent finishing the window frames, a long and arduous process that seems to have taken 99% of the time spent building the house. I’ll have to write a dedicated post in the future describing the window framing. Each window required so much measuring and cutting and fitting things together — it’s like building a delicate piece of furniture, but the piece is hanging one story up in the sky and you need a ladder to access it.
The aluminum flashing was formed by Don in the field and careful cut and wedged into place.
Here’s a shot of the spacers that will keep the siding offset from the walls. The little gap between the siding and the wall allows air to flow from under the siding up into the space just below the roof, rising at it warms up and serving to prevent the buildup of moisture that can lead to rotting.
Be sure to check out the photostream for more detailed images (with captions) of whats been happening. At the moment, however, the photostream is down, but hopefully Apple with have it back up soon.


In the midst of a renovation project, skilled contractors meticulously apply layers of drywall mud and tape to seamlessly transform rough walls into smooth surfaces. With practiced precision, they expertly spread the mud, meticulously blending it with the tape to conceal joints and imperfections. Each stroke of their trowel is a testament to their craftsmanship, as they build up layers of mud, patiently smoothing and sanding until the wall is flawlessly uniform. In this dance of technique and artistry, these contractors breathe new life into spaces, turning mere walls into canvases awaiting the strokes of paint.
ReplyDeletedrywall mud and tape contractors
wall mud
Very Excellent post. Thanks For Your Sharing.
ReplyDeleteRoof ventilator for home
The Potwine Passive House project is impressive—achieving such airtightness with a blower door test well below Passive House standards really stands out. The combination of standing seam roofing, insulation, and drywall contributes to both energy efficiency and comfort, while the attention to detail ensures durability and a polished finish. For anyone looking to get similar professional results, drywall repair & installation services in Alpharetta can help make it happen.
ReplyDeleteThis update explains the construction progress and testing phases very clearly, especially how each stage affects overall performance. It’s interesting to see how planning and execution come together in a long-term build like this. For readers following similar projects who may need interior finishing or corrections later on, professional services such as Drywall Repair in Atlanta can be worth considering. Thanks for sharing such a detailed progress report.
ReplyDeleteThis is a very well-written and informative post. I really appreciate how clearly the topic has been explained, especially the way key points are broken down in a simple and easy-to-understand manner. Content like this is very helpful for readers who want to gain practical knowledge rather than just surface-level information. Thank you for taking the time to create and share such valuable content. Looking forward to reading more posts like this in the future.
ReplyDeleteThis is a very well-written and informative post. I really appreciate how clearly the topic has been explained, especially the way key points are broken down in a simple and easy-to-understand manner. Content like this is very helpful for readers who want to gain practical knowledge rather than just surface-level information. Thank you for taking the time to create and share such valuable content. Looking forward to reading more posts like this in the future.
ReplyDeleteThis is a very well-written and informative post. I really appreciate how clearly the topic has been explained, especially the way key points are broken down in a simple and easy-to-understand manner. Content like this is very helpful for readers who want to gain practical knowledge rather than just surface-level information. Thank you for taking the time to create and share such valuable content. Looking forward to reading more posts like this in the future.
ReplyDelete